

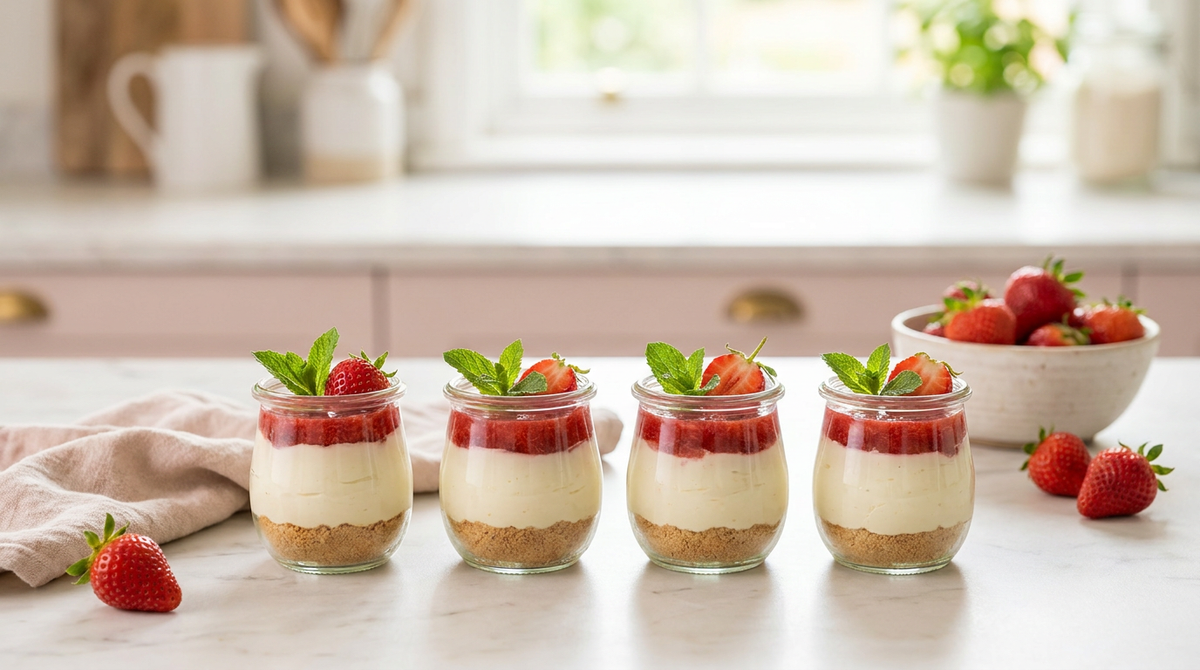
Nobody wants to turn the oven on when it is thirty degrees outside, which is probably why no-bake strawberry cheesecake pots turn up in so many searches the moment the weather improves. They give you all the richness of a proper cheesecake without any baking at all, and served in individual glasses or jars, they look like far more effort went in than actually did. This recipe makes six generous pots, enough for a family gathering, a birthday table, or a small dinner party where everyone gets their own.
Strawberries hit their best in the UK over the warmer months, so this is really the right moment to build a dessert around them. Their sweetness and acidity cut through a smooth, tangy cream cheese filling in a way that heavier desserts cannot quite manage. The result tastes as good as it looks, and it does not ask much of the person making it.
Why No-Bake Cheesecake Pots Work So Well in Summer
Baked cheesecakes rely on gentle oven heat to set the eggs in the filling, which is where most of the risk lies. Too long in the oven and the top cracks, too short and the centre stays wobbly. No-bake versions sidestep that problem entirely, since they set in the fridge instead, using nothing more than whipped cream and softened cream cheese to hold their shape.
Keeping the oven off also keeps the kitchen cooler, which matters more than people expect during a heatwave. Individual pots have a practical edge too. They chill faster than one large cheesecake tin, so the dessert is ready sooner, and the portioning is already done for you.
There is no awkward business of slicing into a soft filling and hoping the piece holds together. Every pot comes out identical, straight from the fridge to the table.
What You Will Need for Six Strawberry Cheesecake Pots
This recipe leans on simple, easy-to-find ingredients. Precision counts for more than complexity here, particularly when it comes to whipping the cream and folding everything together properly.
The Biscuit Base
- 200g digestive biscuits, crushed to fine crumbs
- 80g unsalted butter, melted
The Cheesecake Filling
- 500g full-fat cream cheese, at room temperature
- 100g icing sugar
- 300ml double cream
- 1 teaspoon vanilla extract
- 250g fresh strawberries, hulled and finely chopped or pureed
The Strawberry Topping
- 200g fresh strawberries, sliced
- 1 tablespoon caster sugar
- A few mint leaves, optional
Room temperature cream cheese matters more than most recipes let on. Cold straight from the fridge, it will not blend smoothly with the sugar, and you will end up picking little lumps out of the filling. Twenty minutes on the counter before you start is usually enough.
Choosing the Best Strawberries
Fruit quality makes a real difference in a dessert this simple, since there is nowhere for a bland strawberry to hide. Look for berries that are deep red all the way through, smell fragrant, and show no white or green patches near the stalk. Smaller, in-season strawberries are often sweeter than the oversized ones sold out of season, even though they look less impressive in the punnet.
If the fruit tastes a touch sharp rather than sweet, a light dusting of caster sugar left for ten minutes draws out extra juice and softens that edge. This is worth doing early in the season, before the strawberries have had the sunniest weeks to build up their sweetness.
Step-by-Step Method
The method splits into three stages: the base, the filling, and the assembly. None of it needs specialist equipment, though an electric mixer will save your arm some work.
Preparing the Base
Mix the crushed biscuits with the melted butter until every crumb is coated, then divide the mixture between six glasses or jars. Press it down firmly with the back of a spoon, since a loose base tends to fall apart the moment a spoon goes near it. Chill for at least fifteen minutes while you make the filling.
Making the Filling
Beat the cream cheese and icing sugar together until smooth, with no lumps left. In a separate bowl, whip the double cream with the vanilla extract until it holds soft peaks, and stop as soon as it gets there, because overwhipped cream turns grainy rather than smooth. Fold the whipped cream into the cream cheese mixture gently, then fold in the strawberries. Folding rather than stirring keeps the air in, which is what gives the finished pots their light, almost mousse-like texture.
Assembling and Chilling
Spoon or pipe the filling over the biscuit bases and smooth the tops. Cover and refrigerate for a minimum of four hours, though overnight gives the best, firmest result, and it is worth the wait if you can manage it. Just before serving, macerate the sliced strawberries with the caster sugar for ten minutes to draw out their juices, then spoon them over the top with a mint leaf if you are using one.
Tips for Getting the Texture Right Every Time
Getting a reliable set comes down to temperature and technique rather than any special ingredient, and a few small adjustments make a noticeable difference.
Full-fat cream cheese is worth the extra calories here. Reduced-fat versions carry more water, and that shows up as a filling that looks thin and will not hold its shape once a spoon goes through it. The same logic applies to the cream. Double cream whips to a firmer structure than single or whipping cream, so it is the one to reach for when you want a set that actually holds.
Juicy strawberries can undo all of that good work if they go in wet, so pat them dry with a paper towel first. Excess moisture is the single biggest reason a filling never quite firms up, more often than any issue with the cream cheese or cream itself. On a particularly warm day, some cooks add a small amount of dissolved gelatine as extra insurance, although it is not necessary in most kitchens.
Give the chilling time longer than you think it needs. A pot that still looks a bit soft after two hours will usually have firmed up properly by the four-hour mark, so it pays to resist checking on it too soon.
Make-Ahead and Storage Advice
Part of why this dessert works so well for entertaining is that it actually improves with time. The flavours settle and the texture firms up the longer it sits in the fridge, which takes the pressure off on the day itself.
Make the bases and filling up to two days ahead, covered tightly with cling film or a lid so they do not pick up other smells from the fridge. The fresh strawberry topping is the exception. Add that no more than a few hours before serving, since the fruit starts releasing liquid and looking tired if it sits on top for too long.
There are no eggs and no cooking involved, so food safety is straightforward as long as the pots stay refrigerated and get eaten within three to four days. That makes this a genuinely useful make-ahead dessert, rather than one that only works if it is made at the last minute.
Serving Ideas for Gifting, Parties and Celebrations
Individual dessert pots have caught on for good reason. They travel well, look polished with almost no styling effort, and suit nearly any occasion, from a relaxed family birthday to something more formal like a corporate gathering. A row of glass pots lined up on a table says more thought went in than a single large cake sometimes does, without any extra work on the day.
That is also why this format has become such a favourite for gifting. A well-presented pot feels personal in a way a slice of cake does not quite manage, and there is no cutting or serving equipment needed. Established names in dessert gifting, including Chummys Bakery, have helped make this style popular precisely because it pairs convenience with a genuine sense of occasion.
It suits adult gatherings and milestone birthdays just as well as a family dessert table, and corporate events benefit from it too. Individual pots are easy to hand round at a shared table without plates, knives, or anyone having to slice things up in front of colleagues.
Frequently Asked Questions
Can you freeze no-bake strawberry cheesecake pots?
Freezing works, though the fresh strawberry topping does not hold up well once thawed. Freeze the base and filling without the topping, then add fresh strawberries after it has thawed overnight in the fridge.
Why is my no-bake cheesecake filling runny?
Nearly always one of three things: low-fat cream cheese, cream that was not whipped enough, or not enough time in the fridge. Full-fat ingredients and a full four hours of chilling fix this in almost every case.
Can this recipe be made dairy-free?
Yes, with dairy-free cream cheese and a suitable plant-based whipping cream, though the set will be a little softer. A small amount of dissolved gelatine or a vegetarian setting agent helps firm it up if needed.
How far in advance can I make this dessert?
The base and filling can be made up to two days ahead. Add the strawberry topping closer to serving time so it still looks and tastes fresh.
No-bake strawberry cheesecake pots prove that easy does not have to mean simple. With a little care over technique, and the patience to let the fridge do its job, six elegant pots come together for barely any effort at all.


Share:
Leo Birthday Gift Ideas: Bold, Brilliant Gifts for the Friend Who Loves a Celebration
Afternoon Tea Etiquette Made Easy: What Goes on Each Tier, Tea First or Milk First?